安装配置
下载本仓库,安装第三方包和环境,并在本机测试: 1
2
3
4
5git clone -b hexo [email protected]:wolfbrother/wolfbrother.github.io.git
npm install hexo --save
npm install hexo-deployer-git --save
compile-push-deploy.bat
compile-test.bat
测试成功后部署到github pages: 1
compile-push-deploy.bat
清除历史commit记录并同步到远端仓库: 1
clean-history-hexo.bat
从远端仓库同步到本地: 1
fetch-merge.bat
提交本地仓库到远端: 1
add-commit-push.bat
列表顺序
hexo平台有四中文章列表顺序的规则,分别对应about页面(也是最基本的排序方案)、category页面、archive页面和tag页面,分别由如下四处代码控制:
- 文件
node_modules\hexo\lib\plugins\generator\post.js- 相关代码
const posts = locals.posts.sort('-date').toArray()
- 相关代码
- 文件
node_modules\hexo-generator-category\lib\generator.js- 相关代码
var posts = category.posts.sort(config.category_generator.order_by || '-date');
- 相关代码
- 文件
node_modules\hexo-generator-archive\lib\generator.js- 相关代码
var allPosts = locals.posts.sort(config.archive_generator.order_by || '-date');
- 相关代码
- 文件
node_modules\hexo-generator-tag\lib\generator.js- 相关代码
var posts = tag.posts.sort(config.tag_generator.order_by || '-date');
- 相关代码
其中post.js文件的-date给替换成其它变量,不然会出错。而上面其它三个都是替换后的写法。其中的变量定义在根目录下的文件_config.yml,如下所示:
1 | index_generator: |
上面的-date就是每篇文章的头部的date,如下:
1 | dtindex: 2018-07-27鸿鹄0000 |
其中的dtindex是我自己添加的,把date和title连接起来截取前面部分。相对于用date排序,dtindex可以在给date相同的多篇文章排序时考虑title部分。添加的Python脚本如下,放到文章所在目录,运行即可。可以重复运行。:
1 | import glob |
TeX语法冲突
由于markdown和TeX语法的冲突,hexo在渲染TeX公式方面有不足。config文件里有选项是否开启mathjax,但是渲染效果并不是那么好。比如说会出现公式内的下划线无法识别,而识别为markdown的斜体。
更换Hexo的markdown引擎。,就是把hexo默认的渲染markdown的引擎换掉。 hexo-renderer-pandoc, 很强大的解析器,先卸载hexo默认的markd,再安装新的:
1 | npm uninstall hexo-renderer-marked --save |
这些第三方安装包的下载安装的位置是根目录的node_modules文件夹下。而配置记录可以在根目录的package.json找到,这样根据package.json可以重新构建编译环境。
隐藏首页的某些文章
安装包hexo-generator-index2自带过滤功能,可以根据tag或category来过滤掉首页的某些文章。比如过滤掉tag为hexo的文章,则在_config.yml中配置如下:
1
2
3
4
5
6
7index2_include_index: true
index2_generator:
per_page: 8
order_by: -dtindex # 按发布时间排序
exclude:
- tag hexo # 不包含标签为hide的文章
- category hexo # 不包含分类为hide的文章
文章结尾处的标签、仓库链接
位置themes/next/layout/_macro/post.swig,代码:
1 | {% if post.tags and post.tags.length and not is_index %} |
在hexo-generator-index2的基础上添加文章置顶和解除主页过滤
hexo-generator-index2自带过滤功能,能够按tag或category类别将文章从主页过滤,然而却不支持置顶和解除类别内特定文章的选项。
一方面,在文件hexo-generator-index2/lib/generator2.js的行var posts = locals.posts.sort(generator.order_by);下面添加如下代码来支持文章的top这个属性,也就是在已经按generator.order_by的文章的基础上,再按top属性排序:
1 | posts.data = posts.data.sort(function(first, second) { |
接下来,是按tag或category类别判断每篇文章是否从主页过滤的代码,在里面添加如下代码,即当属性post.not_exclude或者post.top为真时,不把改文章过滤掉:
1 | if (post.not_exclude || post.top) { |
一篇文章在被过滤掉的category里,要将其置顶,其源文件顶格内容为:
1 | --- |
CloudFlare Error 526 无效的SSL证书解決方法
一段时间之后,网页打不开,显示上述问题CloudFlare Error 526 无效的SSL证书解決方法。
解决办法:登录CloudFlare,将SSL/TLS的加密模式选择为Flexible。 
域名
Github仓的Custom domain设置(链接 https://github.com/wolfbrother/wolfbrother.github.io/settings/pages )为域名www.wolfbrother.space,此时发布分支根目录会新增一个文件CNAME,内容是该域名。
也可以自动配置CNAME文件。配置文件 config的url字段设置为url:
https://www.wolfbrother.space ,并新增配置 1
2plugins:
- hexo-generator-cname
source目录下增加文件CNAME内容填写域名www.wolfbrother.space。
另外,Cloudflare的DNS过滤设置为 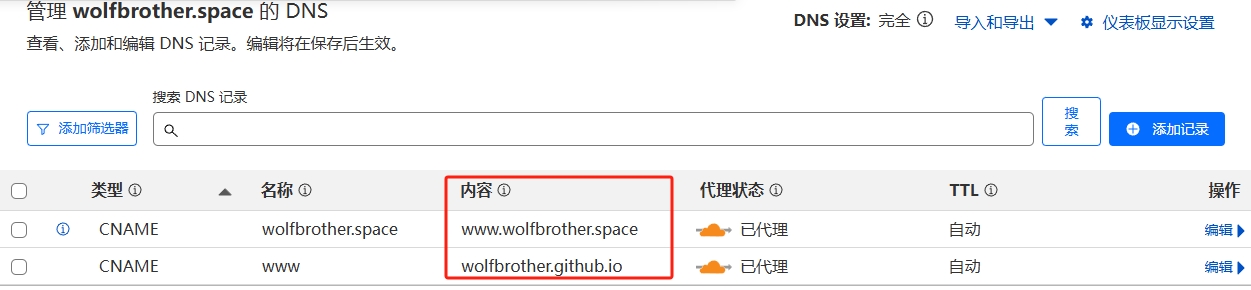
TypeError [ERR_INVALID_ARG_TYPE]: The "mode" argument must be of type number. Received an instance of Object
原因是hexo和npm的版本之间不兼容。解决方法是执行如下命令升级版本:
1
2
3
4
5
6
7hexo version
sudo npm i hexo-cli -g
sudo npm install -g npm-check && npm-check
sudo npm install -g npm-upgrade && sudo npm-upgrade
sudo npm update -g
sudo npm update --save
hexo version
升级版本后,用命令hexo version来查看hexo和node版本信息如下:
1
2
3
4hexo: 7.3.0
hexo-cli: 4.3.2
os: linux 6.8.0-40-generic Ubuntu 24.04 LTS 24.04 LTS (Noble Numbat)
node: 18.19.1
Build with Jekyll缓解,遇到Theme: next github-pages 232 | Error: The next theme could not be found.
github page默认使用jekyll构建。如果不是使用jekyll构建的,需要在根目录添加空白的.nojekyll文件。
本地编译时npm ERR! request to xxxx failed, reason: certificate has expired
执行如下命令 npm config set strict-ssl false
翻页按钮不正常显示
翻页按钮不正常显示,显示为 1
<i class="fa fa-angle-right"></i>
1
2prev_text: '<i class="fa fa-angle-left"></i>',
next_text: '<i class="fa fa-angle-right"></i>',1
2prev_text: '<',
next_text: '>',
去掉评论模块
评论模块非必须,且可能失效,导致无法评论,故去掉该功能。
涉及文件themes/next/layout/_partials/comments.swig,修改点如下:
1
2
3
4
5 {% elseif theme.valine.appid and theme.valine.appkey %}
- <div class="comments" id="comments">
- </div>
{% endif %}